
To start this nail tutorial you will need the following items:
- Base Coat
- Top Coat
- Black and White Striper polish
- Dotting tool
- Red Polish (Glitter Optional)
- Silver Polish (Glitter Optional)
- Yellow Polish
- Cuticle Oil
- Metal Pusher
- Nail File
- Nail Buffer
- Nail Polish Remover
After you have gathered all your items, you will need to set up a clean work area. You may want to lay down a towel to keep your work surface protected.
You will first need to get your nails prepped for polish. You will start this process by pushing back your cuticle. You will want to apply cuticle oil and use the metal pusher to scrape off the dead skin on the nails, as well as add extra length to the nail. After this step, take your nail file and use it to file your nails to your desired shape and length. Lastly to finish prepping your nails for polish you will want to use your buffer to buff the surface of your nail to make it smooth. Finish off by cleaning your nails with polish remover. Now you are ready to paint!
The first coat of polish you will use is your base coat. Apply this, and then let dry. Next step is your color. You can paint layers of red or silver polish on the nails you prefer each design to be on. You can leave some plain color, or put a design on all of them. It is up to you! You will want to let the color dry for approximately 5 minutes before adding the design. This will go over how to make two very popular holiday nail designs!
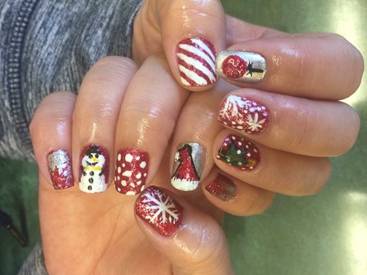
On the silver nails, the design will be a Santa hat. You will start by outlining your Santa hat with black striper polish. Then the hat will be filled in with red. Using white polish, you can add the fluff to the bottom and the top of the hat. I suggest using light wispy strokes to create a fur-like texture.
On the red nails, the design will be a snowman. You will need to use your dotting tool to create a large dot at the tip of your nail. This first dot will be the body of the snowman. Next, using the dotting tool, make a smaller dot on top of the large dot you previously made. This will be your snowman’s head. You should let the dots dry approximately 2 minutes. Next you will use the small end of your dotting tool to create buttons, at this time you should add two small dots for the snowman’s eyes as well. Next, take your black striper polish and create a smile and arms for your snowman. Make sure you are applying firm and steady pressure for your brush strokes. At this time you can create a top hat as well for your snowman if you’d like to. After cleaning off your dotting tool, dip it into the yellow polish. Use this to create the snowman’s nose as well as scarf. You will do this by dragging your dotting tool to the desired length.
Make sure to let your designs dry, and then add a top coat for extra shine! You can add and create other designs if you’d like!
Once completely dry, make sure all your polish’s are closed and to clean up your tools and work surfaces!